

Why Teak Is a Stand-Out Choice
Teak has long been the gold-standard for outdoor furniture because it combines uncommon density with a rich supply of natural oils that repel water, pests, and rot, making pieces both beautiful and remarkably low-maintenance.
Why Even Teak Needs a Little Care
Despite its self-protecting nature, teak still benefits from a light, thoughtful routine: without it, surface oils mix with moisture and dirt, inviting mildew, encouraging hairline checking, and speeding the shift from honey-brown to silvery gray.
What You’ll Learn in This Guide
- Clean day-to-day grime without damaging the grain
- Tackle tough stains and revive color when you want that fresh-cut glow
- Decide whether to seal, shade, or simply celebrate teak’s natural patina
- Prep your furniture for winter, coastal salt, or blazing midsummer heat
At Deck&Co we believe that caring for teak should feel effortless—not intimidating—so this guide distills the best practices into clear, shop-independent steps you can use right away. A few minutes of the right care will let your teak lounge, dining, and accent pieces age gracefully for decades—so let’s get started.
Understanding Teak Before You Start
Teak 101: What Makes It Different
- Natural oils & density: Teak contains its own weather-resistant oils and is a dense hardwood, which helps it resist moisture, pests, and decay.
- Seasonal movement: Like all wood, teak expands and contracts with humidity and temperature. Hairline surface “checks” are normal and don’t affect structural integrity.
- Tannins: Fresh teak can release tannins that cause light discoloration on cushions or porous surfaces. This usually lessens after a few rains and routine cleanings.
The Two Looks: Golden Honey vs. Silver-Gray Patina
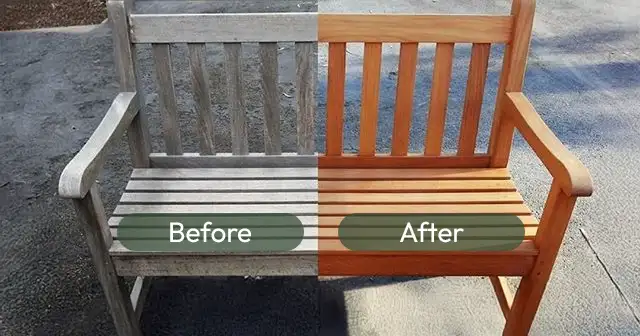
New teak starts out a warm golden brown. With sun, rain, and time, it naturally weathers to a soft silver-gray. Both are desirable finishes—your care routine simply changes based on which look you want to maintain.
- Keep it golden: You’ll clean routinely and may choose a clear, breathable UV-protective sealer to slow color change.
- Let it silver: You’ll still clean routinely, but you can skip color-maintaining steps and simply allow an even patina to develop.
Decide Your Finish Goal First
Before doing any treatments, decide whether you want to preserve the golden tone or embrace the natural patina. This choice determines whether you’ll add protection against UV or just focus on gentle cleaning.
- Golden goal: Plan for periodic cleaning and, if desired, a non-film-forming sealer designed for outdoor hardwoods.
- Patina goal: Focus on even weathering: place furniture where all surfaces receive similar exposure, rotate pieces occasionally, and clean consistently.
Tools & Supplies You’ll Use in This Guide
- Soft-bristle brush or non-abrasive scrub pad
- Bucket, hose, and mild soap (pH-neutral dish soap is fine)
- Microfiber cloths or soft sponges
- Fine-grit sandpaper (220–320) for spot touch-ups only
- Optional: clear breathable outdoor wood sealer (if keeping the golden tone)
- Breathable furniture covers (for off-season protection)
What to Avoid
- Pressure washers or wire brushes that can gouge the grain
- Harsh solvents or cleaners that leave a film or strip wood unevenly
- Covering furniture while it’s wet or damp
- Heavy, film-forming coatings not intended for outdoor hardwood furniture
Quick Safety & Setup Notes
- Work in the shade on a cool, dry day so cleaners don’t flash-dry.
- Test any cleaner or sealer on a discreet area first.
- Protect nearby stone or decking if you’re concerned about tannin runoff during the first cleans.
Routine Cleaning & Basic Care
Supplies Checklist
- Bucket with 1 gal / 4 L lukewarm water
- ¼ cup (60 ml) mild, pH-neutral soap (dish soap works)
- Soft-bristle brush or non-abrasive scrub pad
- Garden hose with a gentle spray nozzle
- Microfiber cloths for wiping and drying
10-Minute Quick-Clean Method
- Rinse first. Hose down the entire piece to remove loose dust and grit.
- Soap up. Mix the soap solution and dip the soft brush; scrub with the grain in long strokes.
- Refresh often. Rinse the brush in the bucket every few passes so you aren’t grinding dirt back into the wood.
- Final rinse. Thoroughly hose off all soap residue until the water runs clear.
- Pat & air-dry. Use a microfiber cloth on puddles, then let the furniture air-dry completely before use or covering.
Monthly Deep-Clean Touch-Up (Optional)
If you see light mildew spots or stubborn grime:
- Add 1 part household bleach to 10 parts water to your soap mix.
- Scrub only the affected area first, then wash the full surface so color stays even.
- Rinse thoroughly and allow extra drying time.
Drying & Airflow Tips
- Set furniture on slats or blocks so legs aren’t sitting in standing water.
- A breezy, shaded location speeds drying and helps prevent water marks.
- Wait until teak is fully dry before replacing cushions or covers.
Common Mistakes to Avoid
- Using a pressure washer—high PSI can gouge or “fuzz” the grain.
- Scrubbing across the grain or with steel wool pads.
- Spot-cleaning only one area (can leave uneven color patches).
- Covering or stacking furniture while damp.
Routine Cleaning & Basic Care
How Often Should You Clean?
A quick fresh-water rinse every week or two keeps airborne dust and pollen from settling into the wood grain. Plan a more thorough soap-and-water wash once each season—or any time you notice a buildup of dirt, sunscreen, or food residue.
Supplies You’ll Need
- ¼ cup (60 ml) mild, pH-neutral dish soap
- 1 gallon (4 L) warm water
- Soft-bristle brush or non-abrasive scrub pad
- Garden hose with a gentle spray nozzle
- Microfiber cloths or soft sponge for wiping and drying
Step-by-Step: The Gentle Wash Method
- Mix the solution: Dissolve the dish soap in warm water inside a bucket or garden sprayer.
- Pre-rinse: Lightly hose down the furniture to loosen surface dust and cool the wood.
- Scrub with the grain: Dip the brush or pad into the soapy mix and scrub along the direction of the wood grain, working on one panel at a time.
- Rinse thoroughly: When suds turn gray, rinse the section immediately with clean water before moving on.
- Air-dry completely: Let the furniture dry in a shaded, well-ventilated spot before covering or returning cushions.
Quick-Drying Tips
- Stand chairs upright to let water drain from joints and slats.
- A clean, dry microfiber cloth speeds up drying on tabletops and armrests.
What to Avoid
- Pressure washers or “jet” hose settings that can raise or gouge the grain
- Steel wool, scouring pads, or abrasive powders
- Bleach-heavy cleaners on sealed or color-guarded teak (they strip finish unevenly)
- Spot-cleaning just one area; always wash full boards or panels for consistent color
- Covering or storing the furniture while it’s still damp
Deep Cleaning & Stain Removal
When Is a Deep Clean Necessary?
If you notice dark mildew spots, greasy barbecue splatters, or stubborn drink rings that don’t lift with routine washing, it’s time for a deeper treatment. Aim to deep-clean once a year—or sooner if pieces live under dense trees or heavy use.
Supplies Checklist
- Soft-bristle brush or non-abrasive scrub pad
- Mild dish soap solution (¼ cup soap to 1 gallon warm water)
- Optional booster for mildew: 1 cup household bleach per gallon of soapy water
- Commercial teak cleaner or brightener (for gray or badly stained wood)
- Fine-grit sandpaper (220–320) for spot refinishing
- Clean microfiber cloths, bucket, and garden hose
Step-by-Step: Mildew & Heavy Grime
- Mix your cleaning bath: Combine the soap, warm water, and bleach (if needed) in a plastic bucket.
- Pre-wet the wood: Lightly hose down the entire piece to prevent cleanser from absorbing unevenly.
- Scrub with the grain: Dip the brush into the solution and work in long strokes following the wood grain, one board at a time.
- Dwell time: Let the foam sit 3 – 5 minutes so it can loosen grime—don’t let it dry out.
- Rinse thoroughly: Flush with clean water until runoff is clear and free of suds.
- Air-dry fully: Allow 24 hours of dry weather before replacing cushions or applying any treatment.
Targeted Stain Solutions
| Stain Type | Method |
|---|---|
| Mildew “black dots” | Use soapy solution boosted with bleach. Scrub lightly; rinse well. |
| Grease & food oil | Apply a few drops of dish soap directly, wait 5 minutes, then scrub. Follow with full wash. |
| Wine, coffee, or teak oil drips | Lightly sand along the grain with 320-grit paper; wipe dust, then wash and rinse. |
| Water rings from glasses | Cover the ring with a clean cotton cloth and pass a warm (not hot) household iron over it for a few seconds to lift moisture, then clean. |
| Gray, weather-beaten color you want to refresh | Apply commercial teak cleaner/brightener per label; scrub, rinse, dry; optionally seal to lock in the refreshed tone. |
Light Sanding: A Last-Resort Touch-Up
For stubborn marks that survive cleaning, a gentle pass with fine-grit sandpaper can restore the surface. Always sand with the grain, use even pressure, and blend the edges of the sanded area so color remains uniform.
After-Care Tips
- Rinse nearby decking or stone to remove cleaner residue and tannins.
- Let wood dry at least 24 hours before applying a sealer or returning cushions.
- Re-tighten any hardware you loosened for cleaning.
Avoid These Common Mistakes
- Leaving bleach solution on too long—it can lighten wood unevenly.
- Using pressure washers: they raise the grain and leave “fuzzy” fibers.
- Sanding cross-grain or with coarse paper; it scars the surface.
- Applying sealers or covers to damp teak; trapped moisture can darken or mildew.
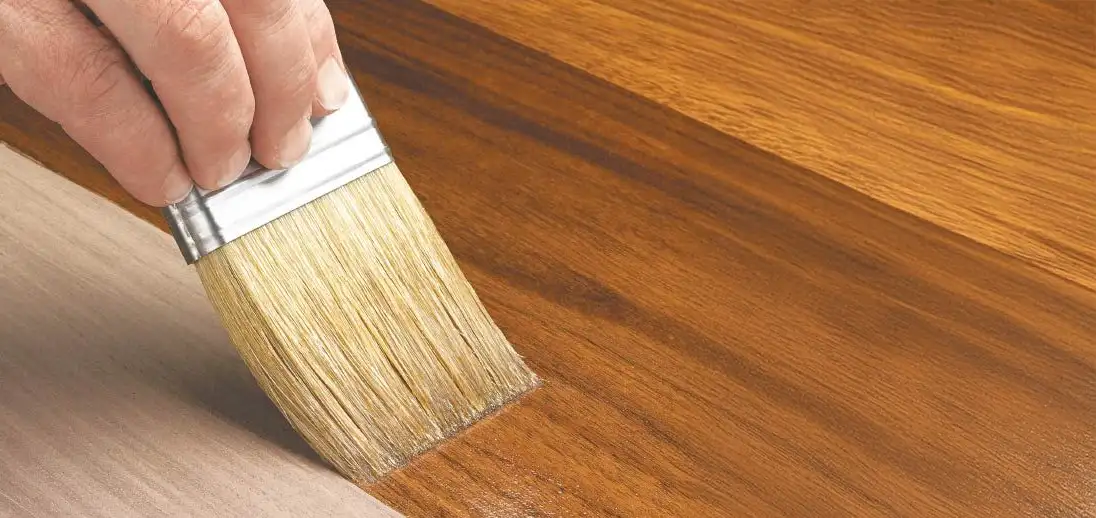
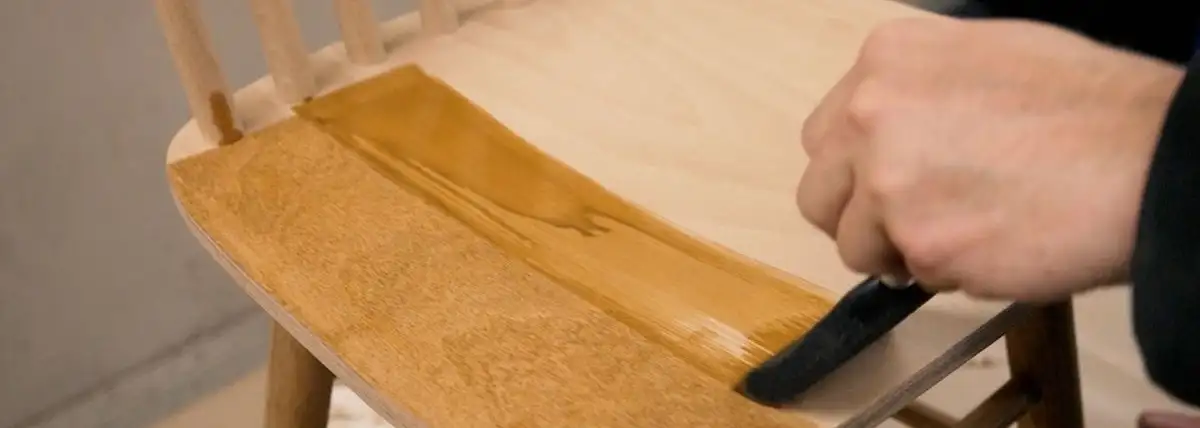
Maintaining or Restoring Teak’s Golden Color
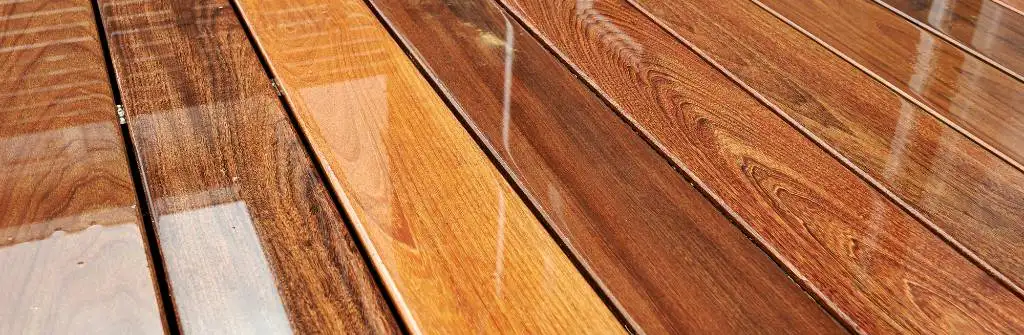
Three Product Paths, Three Finishes
- Teak Oil: Penetrates quickly and deepens the honey tone, but oxidizes fast—expect to re-apply every 2-3 months. Best for show-pieces you don’t mind refreshing often.
- Clear Teak Sealer: A breathable, water-based finish that slows UV graying for 9-12 months per coat without leaving a surface film. Ideal for low-effort, long-term color retention.
- Color Guard / Tint: Adds a subtle pigment that counteracts UV fade; re-coat annually. Useful when you want to “lock in” that just-bought shade.
When & How to Apply a Teak Sealer
- Timing: Apply after the first light cleaning—or anytime the wood is spotless, bone-dry, and at least 48 hours after rain.
- Prep the surface: Dust off and lightly sand rough patches with 320-grit paper; wipe away dust.
- Stir, don’t shake: Shaking traps bubbles that leave cloudy spots.
- Brush with the grain: Use a clean synthetic brush or lint-free cloth, coating end-grain and joints first.
- Work in thin layers: A heavy coat sits on the surface and may peel; two thin coats 30 minutes apart penetrate better.
- Cure time: Let pieces dry 24 hours before use; avoid cushions for the first day so airflow can cure hidden areas.
Reviving Weathered or Unevenly Grayed Teak
If furniture has already turned silver—or shows blotchy sun patterns—use a commercial teak cleaner/brightener first. It opens the grain, removes surface oxidation, and restores a uniform tone that accepts sealer evenly.
Tips for Even, Long-Lasting Results
- Work in the shade; direct sun flash-dries sealers and causes lap marks.
- Keep a “wet edge” by finishing one full board before moving on.
- Rotate tables and benches every few weeks so all sides receive similar sun exposure, preventing two-tone fading.
- Refresh with a single maintenance coat the moment water stops beading on the surface.
If You Prefer the Natural Silver Patina
Skip sealers entirely and focus on regular cleaning so weathering stays even. Place furniture where all surfaces receive similar sunlight, or rotate pieces periodically to avoid shadow stripes.
Seasonal & Climate-Specific Maintenance

Winter Protection: Cold, Wet, and Freezing Conditions
- Clean before covering: Give furniture a thorough wash and let it dry 48 hours so trapped moisture doesn’t mildew or darken the grain.
- Use breathable covers: Choose vented, water-repellent covers that allow airflow; avoid plastic tarps that trap condensation.
- Elevate slightly: Place glides or small blocks under table and chair legs so melting snow drains away instead of wicking upward.
- Store cushions separately: The first season especially, oil migration can stain fabrics left in prolonged contact with damp teak.
- No heated garages: Extreme indoor heat dries the wood too quickly and can exaggerate checking.
Coastal Care: Salt Air & High Humidity
- Fresh-water rinse: Spray furniture lightly every week or two to remove salt crystals that can etch the surface and dull hardware.
- Quarterly wash: Do a full soap-and-water clean each season to dislodge deep salt buildup and algae spores.
- Extra UV defense: Near-shore sun is intense; consider a clear sealer or color guard every 9–12 months to reduce bleaching and surface fuzzing.
- Inspect hardware: Stainless fasteners resist rust but still benefit from a dab of marine-grade lubricant once a year.
Hot & Dry Climates: Desert Sun and High Heat
- Shade when possible: Umbrellas or pergolas reduce severe UV exposure that accelerates graying and surface checking.
- Hydrate—not soak: A light mist with the hose cools surfaces before cleaning, preventing soap from flashing dry and streaking.
- Monitor gaps: Wood shrinks slightly in very low humidity; tighten screws if joints feel loose at mid-summer peak.
- Watch for spills: Hot sunscreens and tanning oils can bake in quickly—wipe them promptly to avoid dark spots.
Quick Off-Season Checklist
- Give each piece a gentle wash and full dry.
- Tighten visible hardware.
- Apply a maintenance coat of sealer if you want to preserve the golden hue.
- Cover or store in a cool, ventilated space—never wrap in plastic.
- Set a reminder to check covers after heavy storms or snow loads.
Hardware & Structural Check-Ups

Why It Matters
Even the most robust teak frame relies on stainless-steel or brass fasteners for long-term stability. Seasonal wood movement can loosen screws and allow subtle wobbling that, if ignored, wears out joints or causes premature splitting.
Inspection Schedule
- Quarterly: Do a quick tighten-and-tap check when you perform routine cleaning.
- Annually: Remove seat slats or tabletops (if design allows) to inspect hidden bolts and brackets.
- After extreme weather: Check immediately following storms, freeze-thaw cycles, or high-heat waves that can expand and contract wood rapidly.
What to Look For
- Loose screws or bolts: Gently snug with the proper driver—avoid overtightening, which can strip threads in the wood.
- Tiny surface “checks”: Shallow hairline cracks along the grain are normal and cosmetic; only act if cracks become deep and affect strength.
- Rust spots: Quality outdoor hardware is corrosion-resistant, but airborne salt or pool chemicals can stain; clean with mild soap and a nylon brush.
- Joint gaps: Seasonal shrinkage may open small gaps; tighten hardware and lightly sand edges to prevent snagging fabrics.
- Rocking or racking: Press diagonally on tables and chairs; if they flex, tighten cross-braces or add a drop of marine-grade wood glue to dowels as needed.
Maintenance Tips
- Keep a dedicated set of stainless-compatible driver bits with your outdoor gear; mixed-metal contact can gall threads.
- Add a dab of clear, non-staining lubricant (e.g., silicone grease) to bolts during yearly service to ease future adjustments.
- Replace missing plastic or rubber foot glides promptly; unprotected legs soak up standing water and may stain decking.
- If a joint remains loose after tightening, back the hardware out, inject a small amount of exterior wood glue, re-insert, and clamp gently for 24 hours.
When to Call a Pro
If you notice structural cracks wider than ⅛ inch (3 mm), severe wobble you can’t correct with tightening, or hardware corroded beyond simple cleaning, contact a furniture repair specialist. Early intervention preserves both safety and the lifespan of your teak investment.
Quick Do’s & Don’ts Cheat-Sheet
Do
- Wash entire surfaces—never spot-clean only one area.
- Scrub gently with the wood grain using a soft brush or pad.
- Rinse thoroughly after cleaning to remove all soap and tannin runoff.
- Let furniture dry completely before covering or returning cushions.
- Use breathable, vented covers for off-season protection.
- Rotate pieces periodically for even sun exposure and weathering.
- Tighten hardware every few months to keep joints snug.
- Touch-up small marks with fine-grit (220–320) sandpaper only.
Don’t
- Scrub cross-grain or use abrasive pads like steel wool.
- Blast surfaces with a pressure washer or “jet” hose setting.
- Allow cleaners or bleach to dry on the wood; keep the surface wet and rinse quickly.
- Cover or stack cushions on damp teak—trapped moisture invites mildew and stains.
- Apply film-forming paints or varnishes not designed for outdoor hardwood.
- Use harsh solvents, chlorine pool water, or acidic cleaners that strip natural oils.
- Seal or oil factory-gray “pre-weathered” teak without confirming manufacturer guidance.
Maintenance Calendar
Use this at-a-glance schedule to keep your teak looking (and performing) its best all year. Adjust timing if your climate is especially harsh or if furniture sees unusually heavy use.
| When | Tasks |
|---|---|
| At Purchase / Setup | Decide on your finish goal (golden vs. silver); light wash to remove shipping dust; allow two weeks of outdoor acclimation before applying any sealer. |
| Monthly | Quick spray-down to remove pollen and dust; spot-check for spills and wipe immediately. |
| Quarterly (Every 3 Months) | • Full soap-and-water wash • Tighten hardware • Rotate or reposition pieces for even sun exposure |
| Bi-Annually (Spring & Fall) |
• Deep clean (add bleach for mildew if needed) • Light sanding of rough spots • Inspect covers for wear; launder or replace as necessary |
| Annually | • Re-apply clear sealer or color guard if maintaining the golden hue • Lubricate stainless hardware threads • Check foot glides and replace missing ones |
| Before Winter Storage | • Thorough wash and 48-hour dry-out • Install breathable covers or move to a sheltered, unheated space • Remove and store cushions separately in a dry area |
| After Extreme Events | Inspect for storm debris, salt crust, or heat-related checking; rinse or re-tighten hardware as needed. |
Pro tip: set calendar reminders on your phone for the quarterly and annual checkpoints—five minutes of attention now prevents hours of restoration later.
Wrapping Up: Let Your Teak Shine for Decades
Teak earns its reputation for durability, but a little regular care protects your investment and keeps each piece looking welcoming and comfortable year after year. Stick to gentle cleaning, avoid harsh tools or chemicals, and match your maintenance routine to the finish you prefer— whether that’s a warm golden glow or a silvery, time-worn patina.
Deck&Co Pro Tip
Make teak care part of your seasonal routine—just like swapping cushions or checking deck boards. A few minutes each quarter to wash, inspect hardware, and rotate furniture pays off with decades of reliable service and timeless style.
Thanks for trusting Deck&Co for expert outdoor living advice. Now pour yourself a favorite drink, stretch out on that freshly cleaned lounger, and enjoy the view—your teak is ready for whatever the season brings.